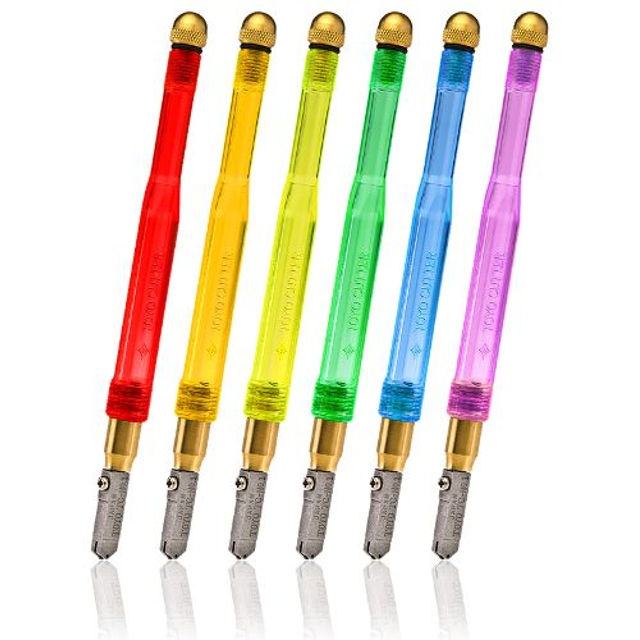
We’ve all been there, the Glass Gods must be on a coffee break because you just can’t seem to cut the glass like you want. Hopefully we can cover some of the real problem areas of cutting and get you back on track. First, the cutter. There are so many different types of cutters. Most of us that do stained glass will agree that the Oil Fed Carbide wheel glass cutters work the best. They will last longer and much more comfortable to hold, unlike your Grandpa’s hardware store cutters. But there are several different styles and manufacturers. We have Pistol Grip cutters for those who need extra help with pressure. We have the Pencil Type Cutters, which you hold like a pencil. Then we have the Custom Grip, which fits in the palm of your hand. When trying to decide which cutter works best for your hand, ask your local stained glass store if they have samples of the different cutters to try out. They all work about the same, but it is important to find a cutter that fits your hand perfectly. This will help with hand fatigue and control. They also make Cutter Cozys and Pistol Grip Cozys to put on your cutter to give you a non-skid handle for a better grip.
Now that we have the cutter worked out, there are a few important tips on scoring the glass. You only score once, never back and forth. If the glass doesn’t break, either score next to your line or try to score it on the backside. You could damage your glass cutter going over the same score. I have found it easier to score your glass on the smoothest side of the art glass. If you want the texture up on your project, simple turn your pattern upside down and trace it on the smooth side. Some types of glass require different pressure with the glass cutter. Opalescent glass tends to need more pressure when scoring. Transparent glasses tend to be softer and need less pressure. Iridescent glass often needs more pressure because the metallic finish seems to make the surface harder. As you become more experience with glass working, you will learn the different characteristics of the glass. If you notice that your score is frothy and white, you may need to back off on the pressure. If you can barely see the score, you may need more pressure. Practice will make it easier to get the pressure just right. It is also important to not lean your cutter to the side, try to keep it perpendicular to your glass. If you are leaning the cutter it will change the angle of the wheel slightly and could cause a “deep” score, which may not break where you want it.
I often get customers that say I can’t cut straight lines and I immediately ask are you using a bar or ruler that your cutter runs along when this happens. I have noticed that when this happens, the cutter is tilted away from the bar instead of straight against the bar. This changes the angle of the cutter and often times plows along the bar instead of rolling along. If you suspect this is happening, have someone stand across from you and watch how your cutter is gliding along the bar. They can see if you are tilting your cutter. Straighten up the cutter and be amazed how easy it is to cut straight lines. Also, when using a bar, it helps to pull your cutter towards yourself, rather than push away.
Having fluid motion while scoring will also improve your cuts. I have better mobility if I stand while cutting. Even though you are tired after a long day at work, it is important to be able to follow your line effortlessly. Use your whole body, not just your hand. This will be beneficial if you have a curve to follow. If you are following a curve, make sure your elbow is pointing out as you score otherwise you may run into your body as you try to navigate the score. I usually do a dry run to make sure I can complete the score comfortably and in control.
Another factor to successful glass cutting may be the height of your cutting table. If you’re height challenged, and your table it too high, it will be hard to maintain the correct pressure when scoring. If you feel like taking a nap after scoring a few pieces, it may mean that you’re working too hard. Try moving to a lower table and see if it helps with the fatigue and control of your cutter.
If you have tried all of these ideas and nothing seems to work, maybe the magic has run out of the cutter. Your cutter may need a tune up to get it back to when you first brought it home. Sometimes, tiny chips of glass can get behind the cutter wheel and keep it from rolling freely. I roll the wheel on my hand an few times to see if it is rolling well. You can put a drop of cutter’s oil on the wheel before you do this to help free up the wheel. If this isn’t it, your cutter may have a nick in the wheel or just plain worn out. An easy test to see if your cutter is rolling properly is to get a piece of mirror and score 5 or 6 straight scores about 1/4″ apart. If there is a nick in the wheel, you will see it at the same spot on each line. The mirror helps reflect the score so it is easier to see. If this is the case, you probably need to replace the cutter head. Oil Fed Carbide glass cutters will last a long time it they are taken care of. Don’t drop them point down on the workshop floor and don’t store them around your flux. Flux will cause your tools to rust, including your cutter.
For those who’s hand strength just isn’t there anymore, I recommend The Cutter’s Mate tool. It will allow you to cut any shape at just the right pressure. It can be the miracle that gives your stained glass hobby a new life.
Cutting can be 90% mechanics and 10% luck so I hope that these tips can help you improve your cutting skills.

This article is very helpful! I’m needing to replace my cutter head on my Fletcher pistol grip but I don’t see any screws that need to be removed. How do I replace the head for this cutter? Thank you!
Fletcher cutters don’t have a screw that holds it in place. Just pull it out of the holder. There is an o-ring that holds it in place.
Great article, thank you for your insight !
These are fabulous tips!